| |
||
Overview
The ProblemThe brake pads and discs are highly ordinary wear and tear spare part that needs to be replaced now and then. A good pratice is to look over the condition of the brake pads and discs when for example changing tires in autumn and spring. Or if the warning light goes on, you should consider changing break pads (and brake discs if needed) in a quite near future. All E87 1-Series cars are equipped with a brake pad wear warning system. However not all four wheels are equipped with a sensor, only one wheel per axle. For the front axle it is located on the left wheel and for the rear axle it is located on the right wheel. However it is not recommended to wait until the warning light goes on since only one brake pad wear sensor is mounted for each axle (and on only one brake pad for each axle). You can never know for sure the condition of the brake pads not equipped with a sensor, only guessing. Only two brake pads are monitored, the remaining six are unmonitored. There are a number of reasons why brake pads mounted on the same axle can wear unevenly. Tools, Skills And PartsThe job is pretty straightforward and does not include any special tools. Difficulty Level
The following tools are required for this particular work (tools marked with green checkmark are optional).
The following spare parts are required for this particular work. Note that the BMW internal numbers are intended for a BMW 120i E87 -06. It is not a requirement to use BMW Original parts, high quality aftermarket parts works just as good (but avoid the cheaper brands). I would strongly recommend (or actually it is more or less mandatory) to buy new brake pad wear sensors, they almost always brakes when removed from the old brake pads.
Removing WheelThe first step will be to remove the wheel at the location where you want to replace brake pads. This includes raising the car and later on also working beneath the car. Therefor a couple of rules are listed that must be followed:
Start by chocking the opposite end of the car from the end that is to be raised. If you only have the equipment to chock one wheel, choose the opposite diagonal wheel from the one you will remove. For example if you will raise the front left side of the car, you should chock the rear right wheel.  A wheel chocked using two plastic chocks placed on each side. Put your gearshift in 1st gear (or in Park if it is an automatic tranny) and then apply the parking brake (emergency brake). Don't skip to chock the rear wheels just because you have applied the parking brake. Before jacking up the car, break loose the wheel bolts. Remember, just break them loose, do NOT unscrew them. Place the matching jack pad in the slot used to jack up the car. There are two slots on each side, front and back. Do NOT use your floor jack directly onto these slots, they WILL break and get mashed.  Use appropriate jack pad matching the slot used to jack up the car! Since my car has M Sports suspension and I didn't have a low profile floor jack, I simply made a small ramp out of two layers of 2 cm thick planks. 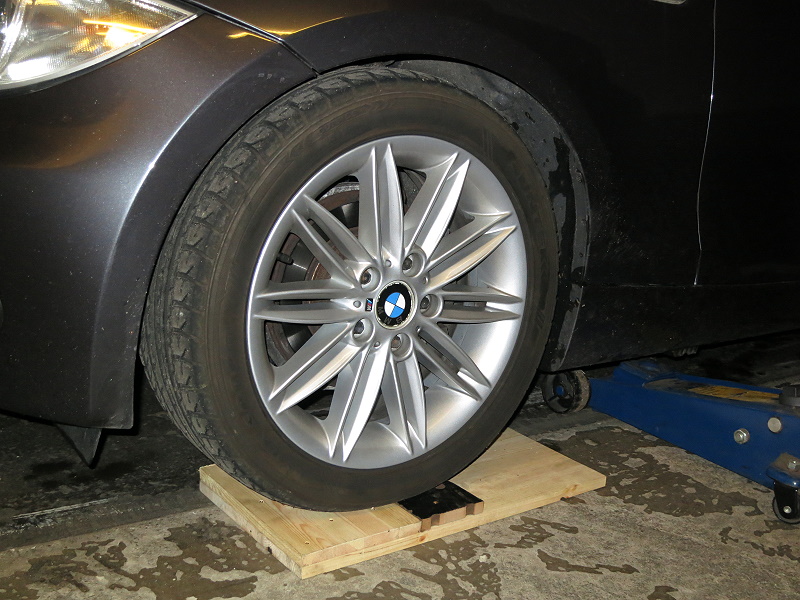 Use some wooden planks if your floor jack isn't low enough. With the car raised, remove the wheel bolts and the wheel. Since I couldn't find a suitable location for the jack stand, I placed it under the wheel hub (in case the floor jack would collapse the floor jack will at least prevent the brake disc to crash into the ground - or even worse if your foot or hand is beneath the brake disc when the floor jack collapses). The view in front of you should probably be quite like the one shown in the picture below.  Left front wheel removed and the brake disc together with the brake caliper are visible. Removing Brake Caliper & PadsI would recommend to first trying to undo the small screw holding the brake disc (just try to loosen it a turn or so). Although this is not a step included in removing the brake caliper, it is recommended to start with this. Because if there is anything that could go wrong when changings discs and pads, this is the one. Use a 6 mm Allen key socket on a ratchet and try to undo the screw a turn or so. If you meet any larger resistance, STOP! Put only the Allen key socket into the screw head and strike it with a hammer a few times (this will create movements in the threads helping to separate it from the rust). Then use an impact gun (on very low torque) or an impact screwdriver. Never ever try to remove it (if it's stuck) by just turning - it WILL round off the Allen key head directly! 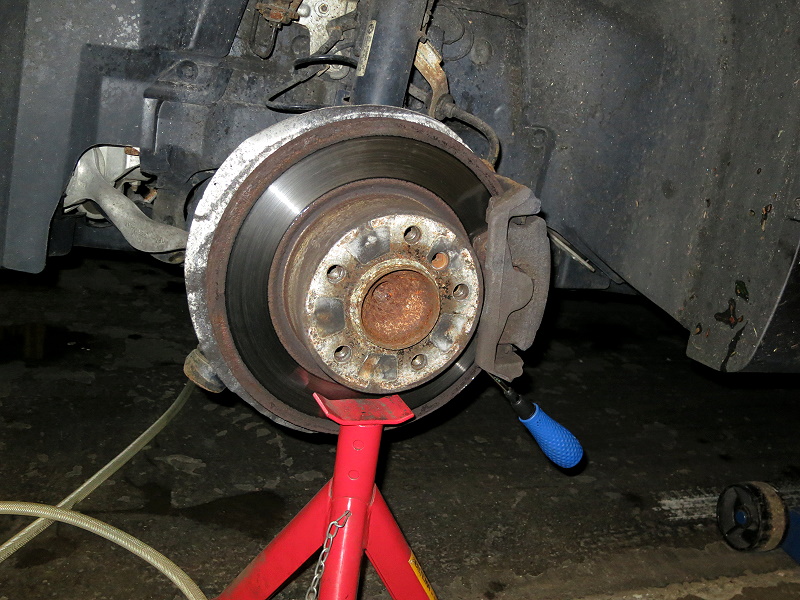 Removing the small (and usually stubborn) screw holding the brake disc. Tips! If your brake disc is turning - put a screwdriver in one of the vent holes. If you are working on a wheel with brake pad wear sensor, start by removing the sensor completely (I wasn't able to easily remove the brake caliper with the sensor still attached to the brake pad). Disconnect it at the junction box, simply unclip the lid and open it upwards. Pull the sensor connector apart (it's the top one), remove it from the two mounting points, remove it from the brake caliper bleeder screw cap and finally pull it out from the brake pad (pull it straight out). It will most certainly break when you do this so don't worry about trying to be gentle.  The location of the contact to the brake pad wear sensor in the junction box. Now back to the actual steps needed to remove the brake caliper. Remove the two screws at top and bottom of the brake caliper. Use a 13 mm socket and a long ratchet or similar to get them off. If the guide pin starts to spin, use a 15 mm open-end wrench as a counter hold. 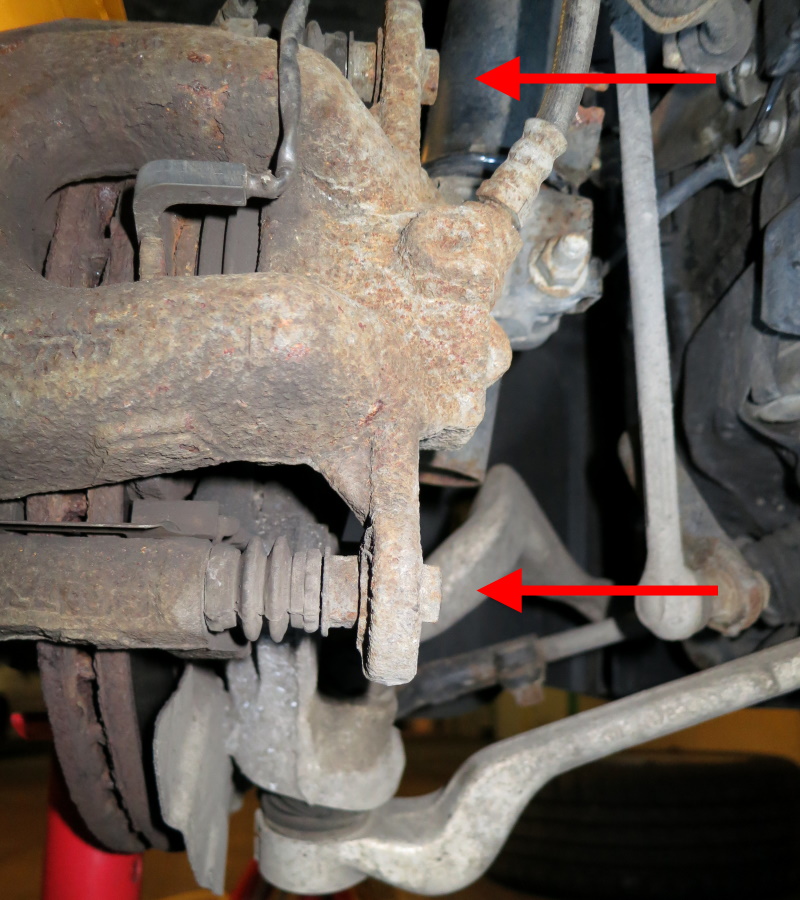 The two bolts holding the brake caliper in place. Remove the brake caliper completely. Do NOT let it just hang in the brake line, hang it in a stiff wire or a bungy cord or similar. 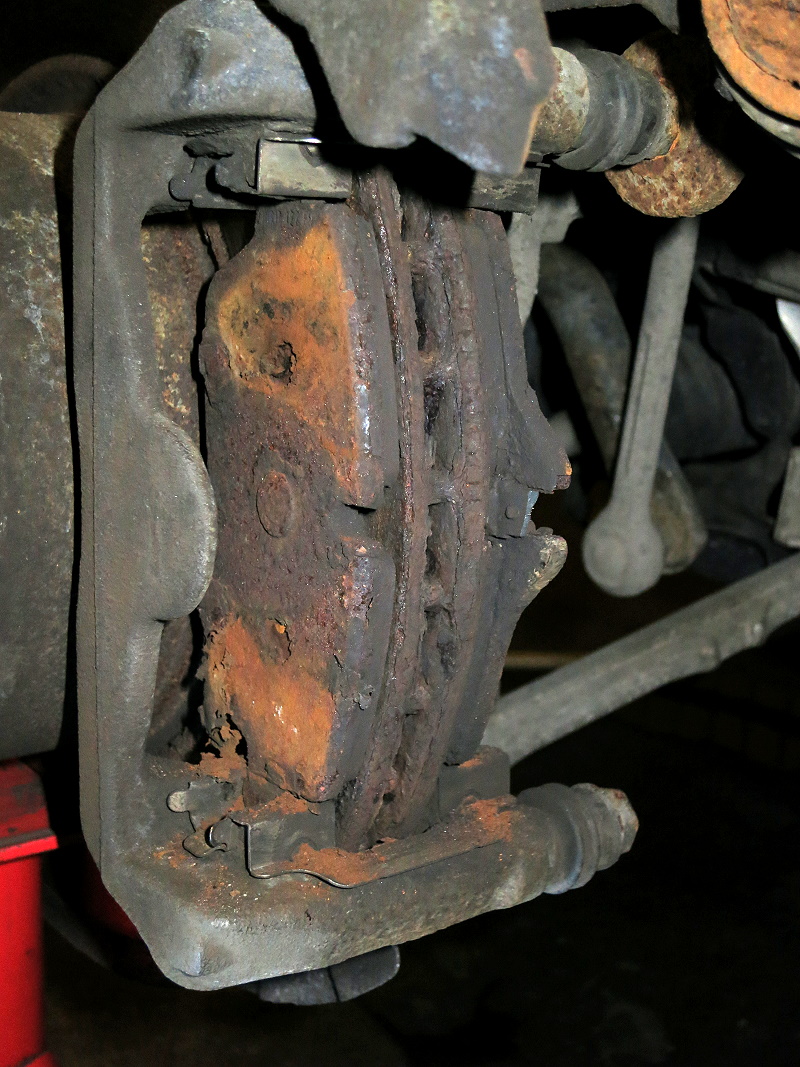 With the brake caliper removed the brake pads are visible (as can be seen my brakes were in quite terrible state). With the brake caliper out of the way the brake pads can be removed. Simply push them in their brake pad carrier grooves out and away from from the brake disc. 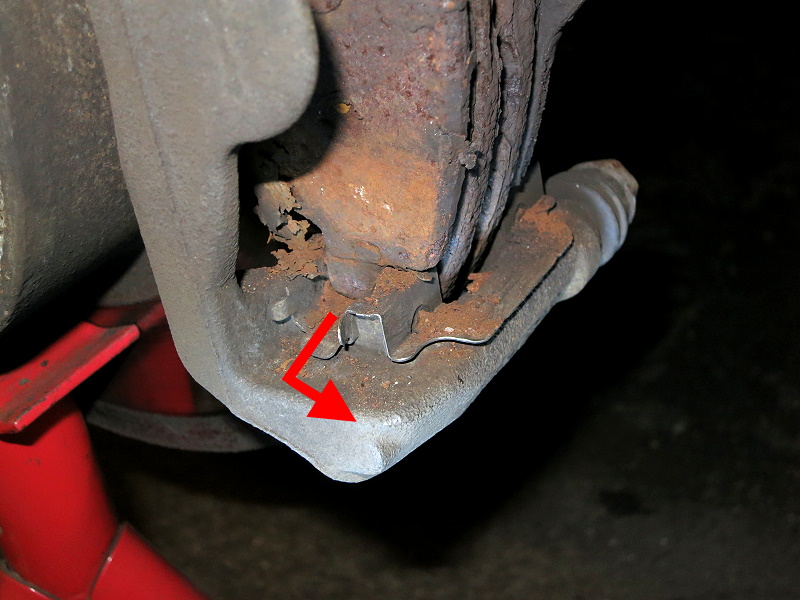 Removing the brake pads from the brake pad carrier grooves. Removing Brake Pad Carrier & DiscThe brake pad carrier is hold into place by two bolts with 18 mm hex head. Use a long breaker bar or even better an impact gun since these can require some force to get undone. Tips! Turn the wheel outwards for better access with the impact gun! 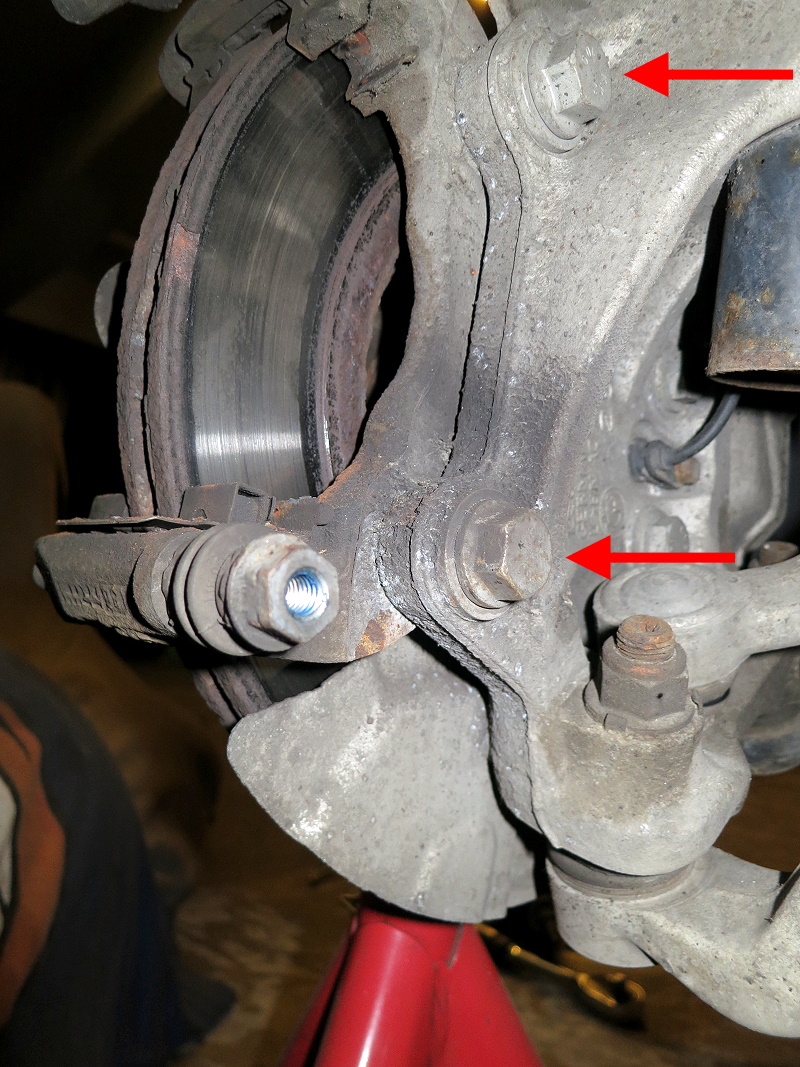 Bolts holding the brake pad carrier mounted to the front strut assembly. Once the brake pad carrier has been removed, remove the screw holding the brake disc in place and remove the brake disc itself. Cleaning Brake DetailsStart by disassembling the brake pad carrier. This is the view you should have right now, a brake pad carrier complete with dirt :-)  Complete brake pad carrier to be disassembled and cleaned. Remove the guide pins and the protective sleeves by removing the protective sleeves from the grooves and pull the guide pins straight out. 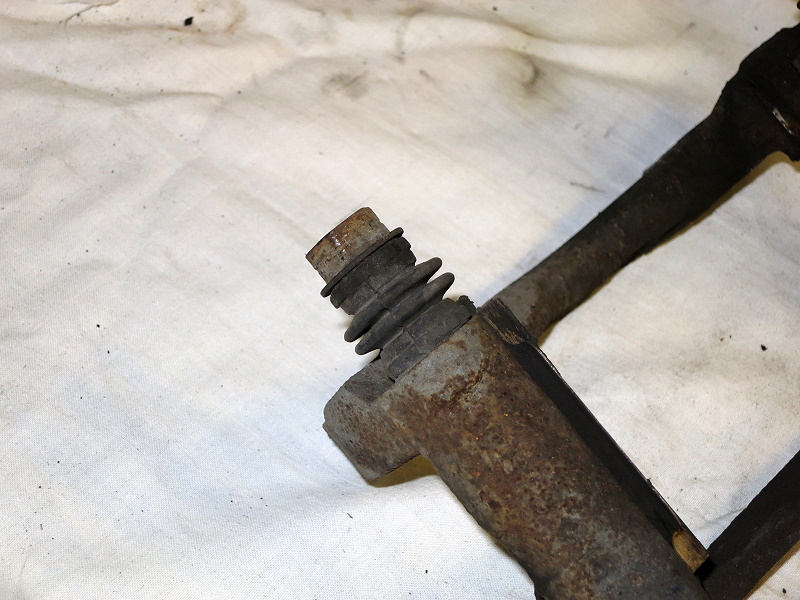 Guide pin and protective sleeve. 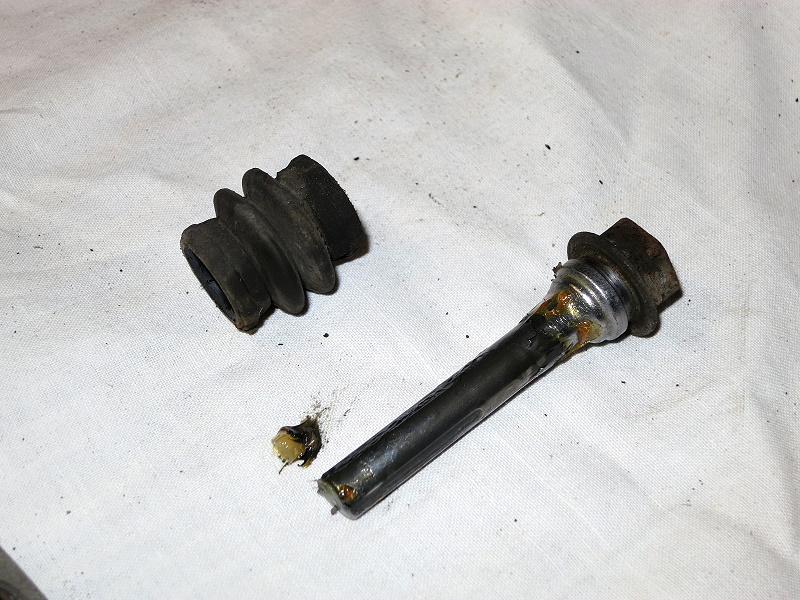 Disassembled guide pin and protective sleeve - this one was in very good condition. |
Remove the metal anti-rattle clips on the brake pad carrier, use a screwdriver to pry them loose. Usually new ones comes with your brake pads, if not be a bit gentle when removing them as they are a bit flimsy. Clean the brake pad carrier, the most important areas are the brake pad grooves and the holes for the guide pins. Use a thin wire brush to clean the grooves for the brake pads. For the holes it is usually enough with brake cleaner, small bottle brush and some compressed air. If the area beneath the anti-rattle clips is rusty and uneven, it is recommended to take a square file and tidy up the surface. Otherwise it is possible that the anti-rattle clips doesn't seat correctly and can prevent the brake pads to move freely. If the area looks clean and even, there is no need to use a suqare file (this is what BMW recommends in a later brake job procedure description). The main goal is to have a flat surface and preventing rust to appear. Therefore it is recommended to put a thin layer of anti-seize compound or similar corrosion protection (or general brake lubricant like ATE Plastilube) between the brake pad carrier and the anti-rattle clips to prevent rust buildup. Since I this time only got one new guide pin bolt for each side, you need to refurbish two old ones (some brands/packages comes with two new guide pin bolt per side and some brands/packages only with one). If needed, use for example a circular nylon brush on an electric drill to remove the old locking compound (so you can apply new locking compund). 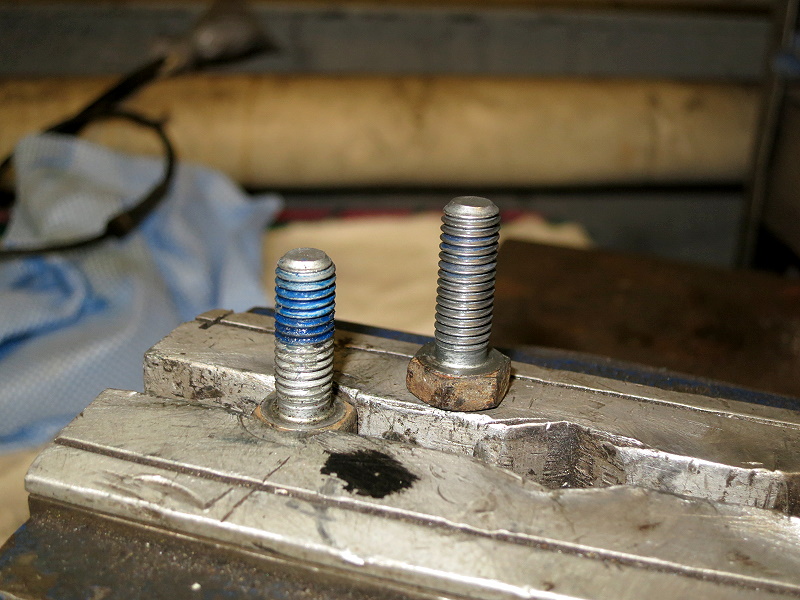 One guide pin bolt with old locking compound and one refurbished. Finally time to put everything together. Apply a thin coat of silicone grease, ATE Plastilube or similar (do NOT use petroleum based grease) on the guide pins and put back the protecting sleeves on the guide pins (make sure they are properly seated in the grooves). Push the guide pins into the brake pad carrier and once again make sure the protecting sleeves are properly mounted in the grooves of the brake pad carrier. 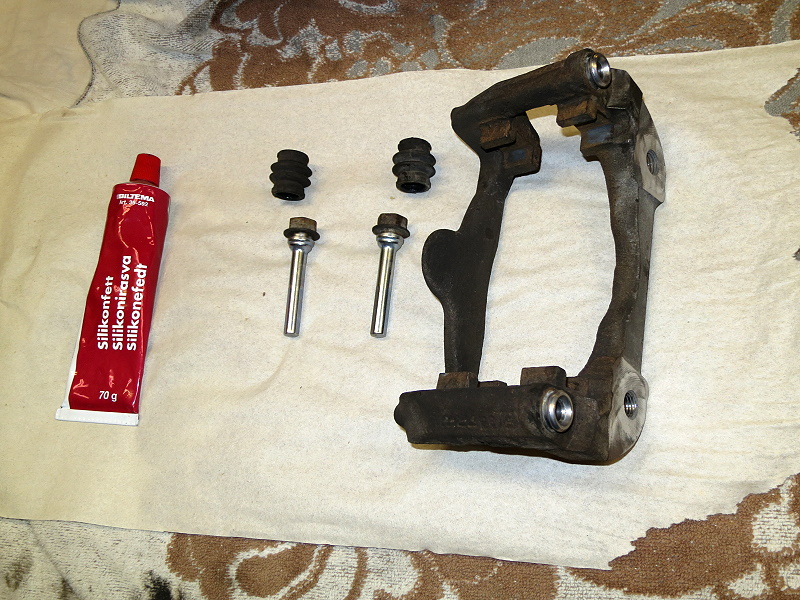 Everything ready for assembly - brake pade carrier and guide bolts thoroughly cleaned. 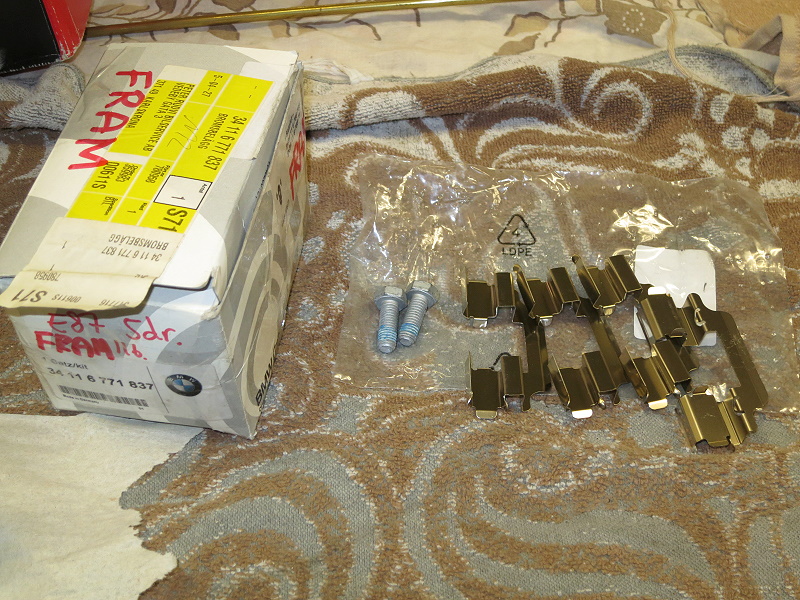 Everything ready for assembly - new set of brake pads complete with guide bolts and anti-rattle clips.  Everything ready for assembly - new set of brake pads complete with guide bolts and anti-rattle clips. Push the new metal anti-rattle clips into place. They can only go one way. Make sure they are seated all the way in. In general avoid apply any grease on the metal anti-rattle clips (as this will tend to attract dirt and prevent the brake pads to move freely). If needed (for example to avoid brake squeal) apply a very thin coat of brake lubricant (like ATE Plastilube) but only where the brake pads make contact with the anti-rattle clips. 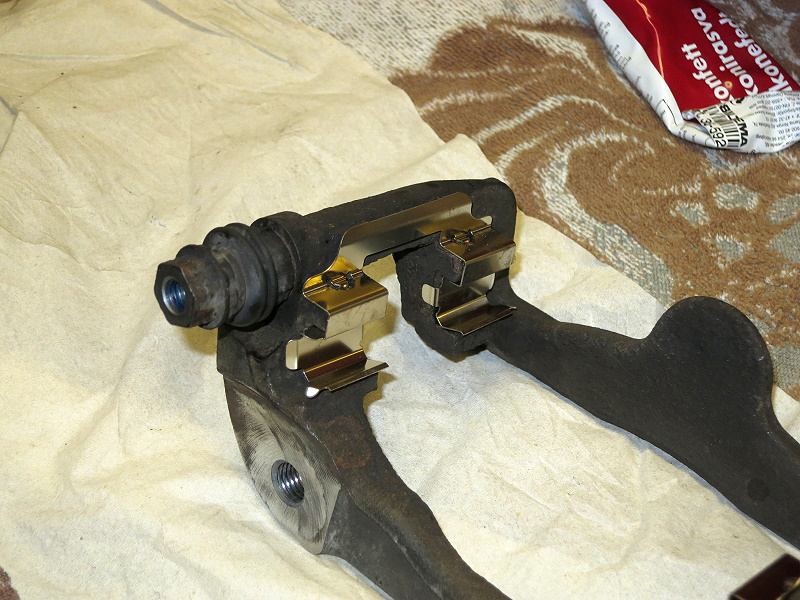 New anti-rattle clips put into the brake pad carrier. And finally, mount the brake pads in the brake pad carrier. It's simply the reverse of removing. The anti-rattle clips have tapered openings to be used to make the installation easier. NOTE! The brake pad with the raised hump for the wear sensor shall always be placed closest to the brake caliper piston.  Complete assembly of brake pad carrier and brake pads. If needed (which almost always is), clean the mating surfaces of the wheel rim and the wheel hub flange. Both my wheel rim and wheel hub flange were in a terrible state so they had to be cleaned. Start by removing any old grease with brake cleaner and a rag or similar. Then use a nylon abrasive pad on an electril drill or air tool grinder. Finish off by wiping it clean with some brake cleaner. On the wheel hub flange, apply a thin coat of anti-seize compound (like Loctite 8009) on the outer lip. Do NOT apply ANYTHING on the flat mating surface - these are friction surfaces and are what keeps the wheel hub, brake disc and wheel rim together (the wheel bolts are only used to create a clamping force). 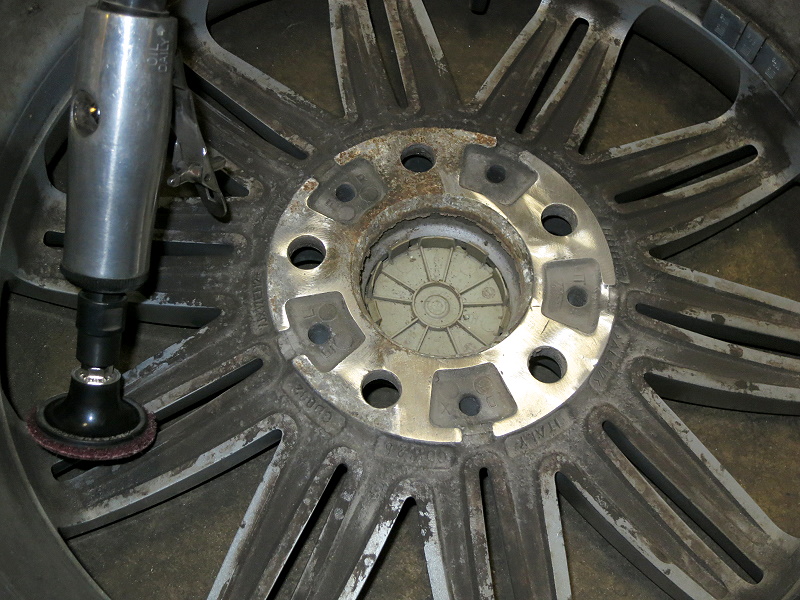 Cleaning the mating surface on the wheel rim. 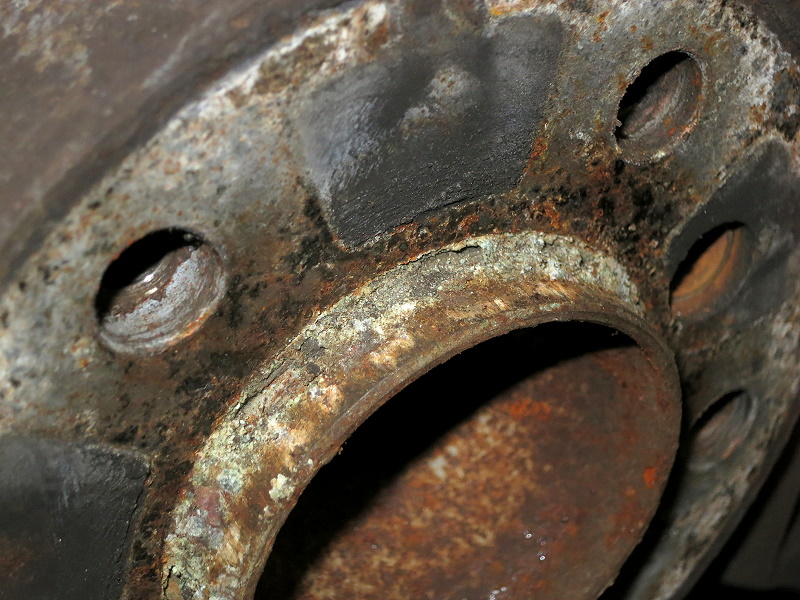 Wheel hub flange full of dirt and corrosion. 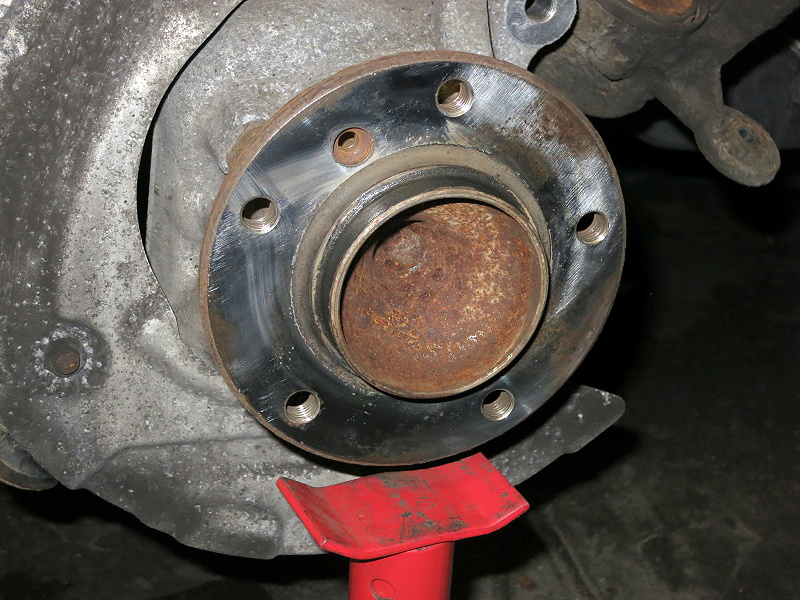 Wheel hub flange cleaned and thin layer of anti-seize compound added on the outer part of the wheel hub flange. If your screw holding the brake disc was hard to remove, then this is a good time to use a thread chaser to clean up the threads. It's M12x1.25 in size (be aware this is fine pitch and not the usual coarse pitch). Installing Brake Pad Carrier & Disc & PadsPull out your new brake discs from the box. They are covered with a layer of oil to keep it from rusting, so that has to be removed. Simply clean the brake surfaces (both sides) with brake cleaner and a rag. 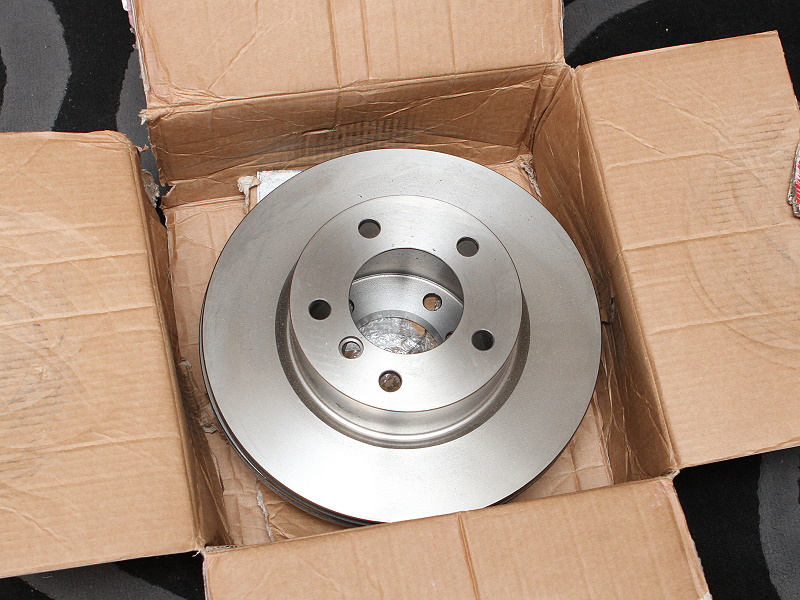 New Brembo brake discs unpacked and ready to be installed. Mount the brake disc on the hub and secure it with the small screw. Put some anti-seize (for example Loctite 8009 which is metal free high temperature anti-seize paste) on the threads! And don't tighten it so damn hard! Hold the brake disc with one hand and fasten the screw with the other - simply fasten very lightly - it only need to keep the brake disc from falling off until you mount the tire (this small screw doesn't keep the brake disc attached to the wheel hub - it's the wheel bolts that does that).  New brake disc mounted and fixed with the small screw. Take the whole assembly of brake pad carrier and brake pads and slide it over the brake disc. Fasten it with the two bolts, tighten both bolts first fingertight and then tighten them down with 110 Nm.  Brake pad carrier mounted and torqued down. Installing Brake CaliperSince the new brake disc and brake pads are a lot thicker you must push back the piston, otherwise you will never be able to slide the brake caliper back in place. You can use a brake pad spreader or a large polygrip (but be careful not to damage the dust seal around the piston if you use the polygrip). NOTE! Before you start pushing back the piston, take a look at the level of the brake fluid reservoir. If it's close to full you need to remove some using a syringe or similar. Because when you push back the piston the level of brake fluid will rise and eventually flow over (and brake fluid is very aggresive to paint so you really don't want to have brake fluid all over the place).  Press back the caliper piston into the brake caliper (to make room for the thicker brake pads) by using a disc brake pad spreader. Slide the brake caliper in place over the brake pads. Push the guide pins in a bit as you slide the brake caliper over them. Line the holes up and fasten it with the two guie pin bolts. Use one of the bolts that came with the new brake pads (pre-coated with locking compound), and use one of the refurbished bolts but apply a small amount of Loctite 243 (or similar medium strength threadlocker). Tighten them down to 35 Nm. 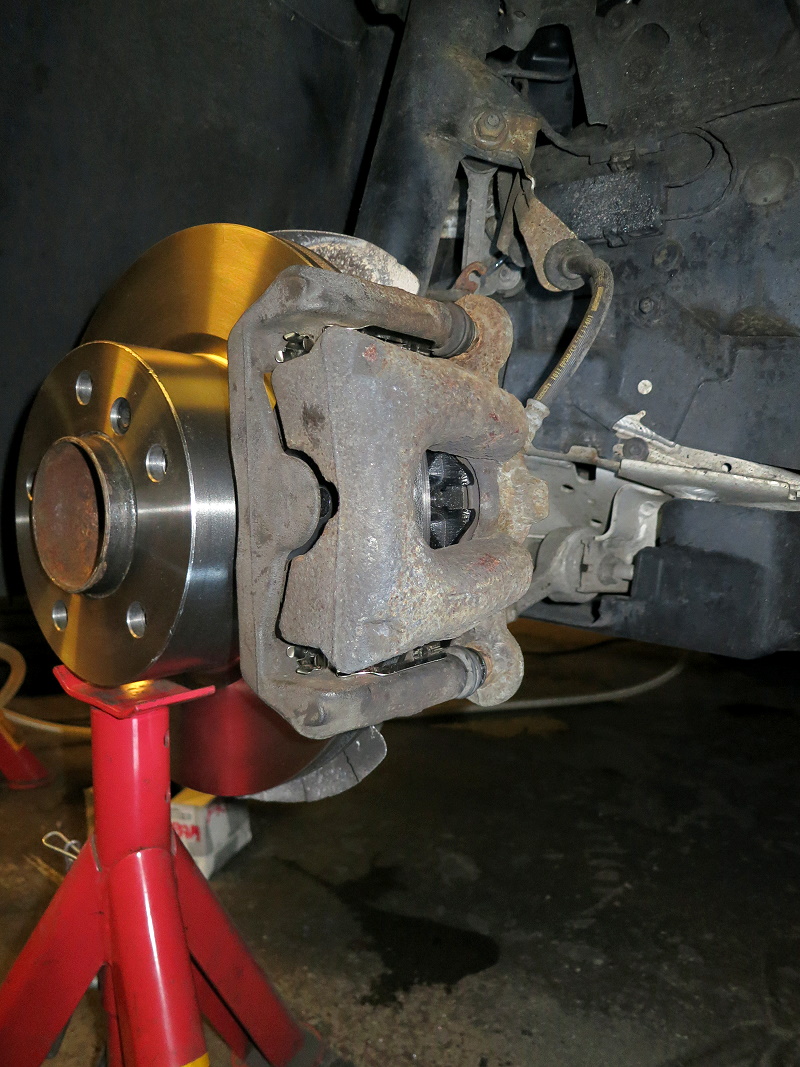 Brake caliper mounted and torqued down. If the wheel you are replacing brake pads on is equipped with a brake pad wear sensor, insert the new sensor into the cutout in the new brake pad (the one closest to the brake caliper piston). Push it straight into the brake pad until it clicks into place. Route the cable through the three fixed locations (bleeder screw cap and two mounting points) and connect it in the junction box. Put the wheel back on and do the wheel bolts hand tight, remove anything you have left under the car and slowly lower the car until the wheel slightly touches the ground (enough to keep it still while you tighten the wheel bolts). Tighten the wheel bolts to their final torque, 120 Nm. Lower the car completely and remove the wheel chocks. NOTE! Depress the brake pedal several times BEFORE you use your car, this to ensure the piston and brake pads are located correctly - which is tightly against the brake disc. Resetting Service IndicatorThe following procedure describes how its done on my E87 120i -06, other models may have a slightly different procedure.
Tightening Torques
Thickness SpecificationsThe minimum thickness specifications for front and rear brake discs are listed below. The source for all values are BMW TIS [2]. If any hesitations what is valid for your car, the minimum allowable thickness is stamped on the wheel hub for all original equipment brake discs.
|